Dual Boot Ubuntu 22.04 alongside Ubuntu 22.04
This article discusses installing two different versions of Ubuntu (or two copies of the same version of Ubuntu side by side) in a “Dual boot” configuration. We are using a UEFI-based system as opposed to a legacy BIOS-based system to achieve our goal. The goal is to create a system which allows us to switch between the two instances of the operating system by switching the EFI boot order rather than rely on having to make manual selections from a GRUB menu.
Note: Although we are using the Ubuntu distribution here, the process is applicable to other Linux distributions. For example Fedora alongside Fedora, etc.
Step 1: Create a bootable Ubuntu USB drive. Refer to the following tutorial for instructions.
https://ubuntu.com/tutorials/create-a-usb-stick-on-ubuntu#1-overview
Step 2: Boot your system from the USB key by selecting the USB option from the boot menu (or selecting that option in your bios boot order configuration). These options are normally accessible by hitting designated keys during the early boot phase. For example on some systems hitting F7 will bring up a boot menu and hitting the DEL or ESC key will bring up the Bios Configuration Menu.
Step 3: After booting from USB key and starting the installation process, the installer will prompt for a disk location to install the Ubuntu. Select the “Something else” option.
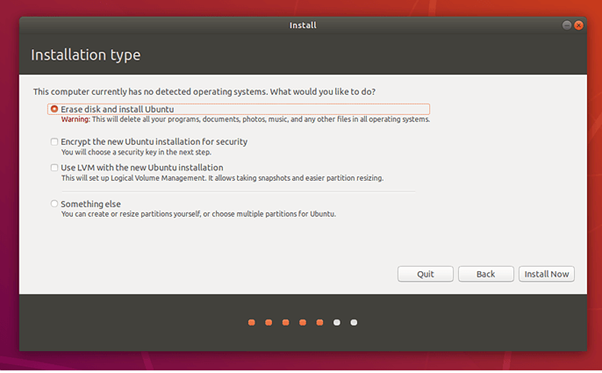 Ubuntu installer screen
Step 4: Create the partitions as defined in the table below. For this example we are using a 250 GB disk and we have sized the partitions accordingly. Given the size of the disk you are using you can change the size or scheme of the partition but the partitions marked in **BOLD **are essential for dual boot.
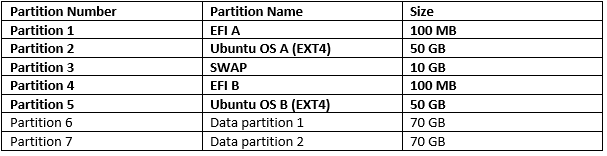 Partition Table
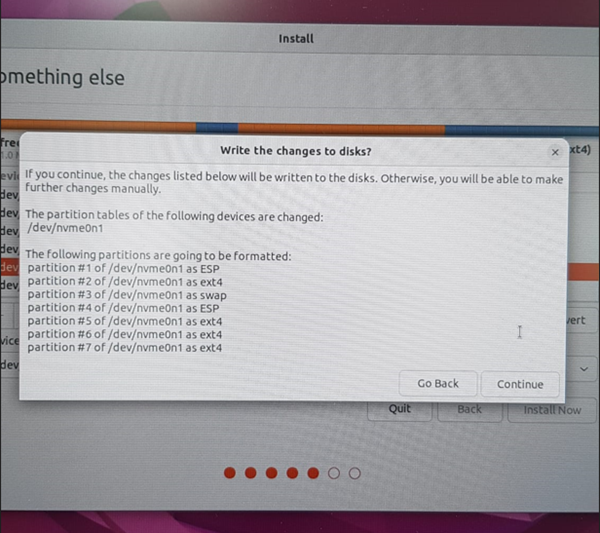 Ubuntu installer showing partitions
Step 5: Select partition #5 to install the Ubuntu OS. Define the mount point as “/” and format the partition using ext4 formatting. You can refer to the following link for more detailed Ubuntu install directions.
https://ubuntu.com/tutorials/install-ubuntu-desktop-1804#7-begin-installation
Step 6: The installer will install the bootloader and configuration files into EFI A partition #1 and OS in partition #5. Once the installation is complete, the system will boot up with EFI A on partition #1 and the GRUB bootloader will load the OS installed in partition #5.
Step 7: After successful login into Ubuntu OS B, we need to move the EFI bootloader from EFI A partition #1 to EFI B partition #4. For this, perform the below given operations.
A). Mount EFI B partition temporarily: sudo mount /dev/nvme0n1p4 /mnt
B). Copy EFI files from EFI A to EFI B: sudo cp -R /boot/efi/EFI /mnt/
C). Unmount EFI B partition: sudo umount /mnt
D). Get the UUID for EFI B partition /dev/nvme0n1p4: sudo blkid -s UUID -o value /dev/nvme0n1p4
E). Replace the UUID of **/dev/nvme0n1p4 with /dev/nvme0n1p1 **in /etc/fstab (/boot/efi) entry.
root@tester:~# sudo blkid -s UUID -o value /dev/nvme0n1p4
43F5-E57Y

root@tester:~# cat /etc/fstab
# /etc/fstab: static file system information.
#
# Use 'blkid' to print the universally unique identifier for a
# device; this may be used with UUID= as a more robust way to name devices
# that works even if disks are added and removed. See fstab(5).
#
#
# / was on /dev/nvme0n1p2 during installation
UUID=6916e733-647a-4ce8-8b0c-61c4197000ef /               ext4    errors=remount-ro 0       1
# /boot/efi was on /dev/nvme0n1p1 during installation
UUID=45D1-4A56  /boot/efi       vfat    umask=0077      0       1
# swap was on /dev/nvme0n1p3 during installation
UUID=0811a10d-3312-48a7-a850-0c113d8bfdb8 none            swap    sw              0       0
Step 8: Now install Ubuntu A to the Ubuntu OS A partition. For that repeat steps 1 to 3. At the partitioning screen, select partition #2 for Ubuntu OS A. Define the mount point as “/” and format the partition using ext4 formatting. Please refer to the following link for more detailed Ubuntu install directions.
https://ubuntu.com/tutorials/install-ubuntu-desktop-1804#7-begin-installation
After finishing step #8, you have UBUNTU OS A and UBUNTU OS B installed on partition #2 and partition #5 respectively. The EFI configuration installed on partition #1 will point to Ubuntu OS A. The EFI configuration installed on partition #4 will points to Ubuntu OS B. The next step is to use the EFI boot variables to switch between two Ubuntu instances. For this, we will use efibootmgr command. This allows us to alter the boot options from userspace.
efibootmgr -v will dump the current boot options. Ideally, we want to keep only OS A and OS B boot options and delete all the others, but depending on your requirement, you can alter the boot options.
root@tester:~# efibootmgr -v
BootCurrent: 0003
Timeout: 1 seconds
BootOrder: 0003,0000,0001,0002,0004,0005
Boot0000* Ubuntu-OS-A  HD(1,GPT,d92d26b7-1251-49f7-819e-742475c27581,0x800,0x30000)/File(\EFI\UBUNTU\SHIMX64.EFI)
Boot0001* Ubunut-OS-B  HD(4,GPT,9c85e16a-f97a-4b9b-bd25-64217d1b1884,0x6ff3000,0x30000)/File(\EFI\UBUNTU\SHIMX64.EFI)
Boot0002* UEFI:CD/DVD Drive     BBS(129,,0x0)
Boot0003* ubuntu        HD(1,GPT,d92d26b7-1251-49f7-819e-742475c27581,0x800,0x30000)/File(\EFI\UBUNTU\SHIMX64.EFI)
Boot0004* UEFI:Removable Device BBS(130,,0x0)
Boot0005* UEFI:Network Device   BBS(131,,0x0)
Delete all of the boot options below using the following command.
sudo efibootmgr -b -B
Example: sudo efibootmgr -b 0000 -B to delete the boot entry at 0000, and similarly for the rest of the boot entries by referencing the corresponding boot entry number.
Add two new boot entries for UBUNTU OS A and OS A
sudo efibootmgr -c -d /dev/nvme0n1 -p 1 -L "UBUNTUOSA" -l '\EFI\UBUNTU\SHIMX64.EFI'
sudo efibootmgr -c -d /dev/nvme0n1 -p 4 -L "UBUNTUOSB" -l '\EFI\UBUNTU\SHIMX64.EFI'
Switch the boot order from user space to boot from other OS after the next reboot.
sudo efibootmgr -o 0000,0001 -> To boot from OS A
sudo efibootmgr -o 0001,0000 -> To boot from OS B